Leather wrap bracelets

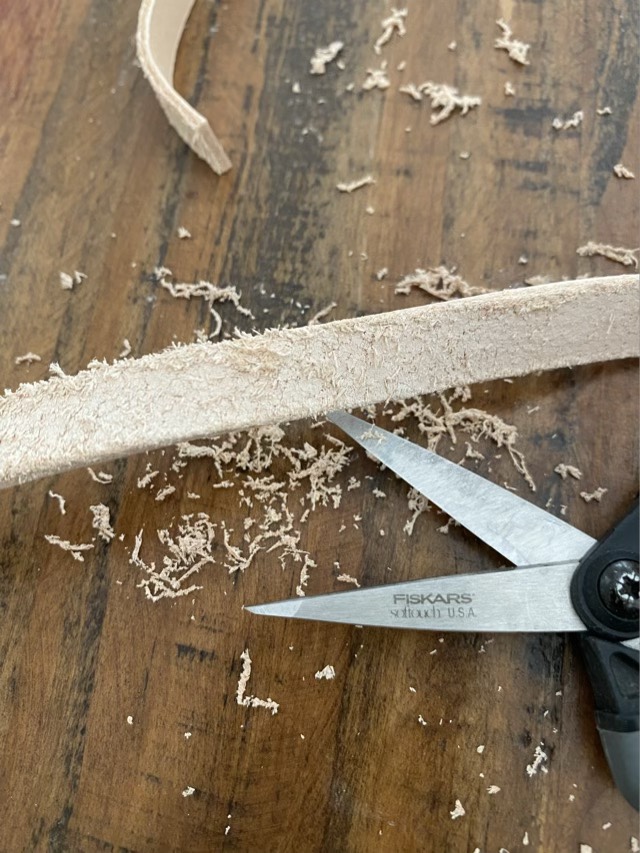
I recently finished a commissioned order for leather wrap bracelets with a saying. I used 1/2” strips of tooling leather, which were a little fuzzier on the back side than I’m used to, so I trimmed the “fuzz” as a first step.

Trimming off excess leather on the back of a tooling strip with scissors

Next I wet and smoothed the edges of each strip round with a slicker. I found a wooden slicker tool awhile back, but am not impressed with it in the raw state. I think I will give it a good sanding and glossy finish before using it again.

Wooden slicker tool and three wet strips of leather

I have multiple options on making the saying on the leather: I have stamps, leather tools, and my pyrography kit. I haven’t done pyrography on leather, so really wanted to see how it might work. I took a scrap piece of tooling leather and did some experiments.

Scrap leather with “Find” written with pyrography

I found that the heat of the pyrography pen, when at about 5 and a half, would burn into the leather and make a mark like stamping, but also darkened the leather. This was what I was hoping for! I could do the sentence free hand. I also found that it was better to dye the leather first, then burn it, then seal it.

Laying out the design on a paper strip “Find Joy and Meaning where you can, and file the rest appropriately.”
Dyed and burned bracelets with buttons unassembled, the shorter one was my test case

Once the pyrography was done, I cut in the button hole and sealed the bracelets. When the sealant was dry, I punched holes for the button and used waxed linen to sew on the button. The leather had become stiff, so some bending and moving freed up the form some.

Finished bracelets sitting on the windowsil

I do really enjoy pyrography, so this was a fun project and discovery!

That is adorable

Missy the dog has a favorite ring chew toy. She likes it so much we’ve had to replace it. Thor the kitten has been trying to figure out what the hubbub is. He’s laid in it, rolled in it, and now went and found his own ring (he stole a bracelet from the youngest’s room), and brought it down to chew on next to Missy’s rings. I didn’t get a picture of him chewing, so you’ll have to take my word for it.

Thor the kitten with his own chew ring next to the dog’s chew rings

Crochet kits

Rather than take separated supplies to my crochet class, I made up individual kits. Each kit has enough yarn to make two amigurumi animals, yarn for the face, a wooden crochet hook, a wire stitch marker, a yarn needle, chenille sticks, and stuffing.

Measuring yarn but subtractive weighing

To divide up the yarn, I placed the big ball of yarn on the scale, tared it, then wound off onto the ball winder. When the scale read the value I needed (negatively), I snipped the yarn and started a new ball.

Supplies prepped
Kits bagged

Each kit will also have a pattern and a label.

He has learned to jump

Thor the kitten has grown enough that he can now jump to counter height. The house is his oyster. Below is a picture of him on the top of our headboard, about six feet tall. He is licking his lips because he just used his jumping skills to get up on Izzy the cat’s feeding shelf to eat senior cat food. He then discovered there was yet another level. He is quite proud of himself.

Thor the kitten on our headboard

Adventures with a mini loom

I recently used points to get a Clover mini loom. I have been using scraps of cardboard to weave samples of my spun fibers to go in my fiber journal, so this was an upgrade!

First finished linen swatch, forgot to take progress photos, warped for fringe on the bottom only, came out a weft-faced weave

I started by following directions, amazingly, but the spacing of the tines were very wide and gave me a weft-faced weave, where the warp threads are completely covered by the weft yarn. This is the technique used for tapestry weaving, but not what I was looking for.

Linen warp doubled up and wrapped completely around the loom, starting with a twined row to space the threads

The next attempt I doubled the yarn in each slot by wrapping the warp yarn completely around the loom. This gave me fringe on top and bottom when it was finished, but the weave came out with both the warp and weft showing.

Linen woven swatch with knotted fringe

I moved on to my hemp yarn, and of course I forgot to take progress photos, but I doubled up the warp thread by making loops around the tines, resulting in a fringeless swatch. I found I didn’t need the twined first row to space the threads. It came out a bit wonky, but I am seeing process improvement.

Four-selvage hemp yarn woven swatch